TDD for Tizen App with NUnit Xamarin SDK
Are you developing Tizen Xamarin App and looking for a TDD framework?
Are you using NUnit TDD solutions on the other mobile platforms and planning to integrate it on Tizen too?
Are you studying TDD for the very first time?
Read this step-by-step guide where you will find detailed instructions on how to use nunit.xamarin test framework which offers a cross-platform SDK with GUI and XML report generation features.
For the comprehensive NUnit feature coverage, please, visit the project site.
Note. By the end of 2017 Tizen .NET and Tizen Xamarin Mobile and TV SDK are available in the Preview mode.
What is TDD?
Test-driven development (TDD) is a software development process that relies on the repetition of a very short development cycle: requirements are turned into very specific test cases, then the software is improved to pass the new tests, only.
This “test-first” programming technique, created by Kent Beck, is opposed to software development that allows to add software that is not proven to meet requirements.
The sequence of steps in TDD is generally as following:
- Add a test
- Run all tests and see if the new one fails
- Write some code
- Run tests
- Refactor code
- Repeat

A graphical representation of the test-driven development lifecycle. Picture source: Wikipedia
The TDD improves the quality and readability of your code, make it self documented and increase the overall productivity of the entire development process.
Following the TDD you should prepare a collection of test cases, covering all or almost all of your app functionality. Each test case should have a life cycle including phases of setup, execution, validation and cleanup. Best practices recommend to separate set-up and tear-down routines, common for a group of test cases.
Few more advises to master your TDD are following:
- You should always start unit test from a known and pre-configured state.
- The ultimate target of the unit test is to ensure that the results and behaviour of the tested entity are correct.
- On the other hand it is important to avoid complicated test cases (KISS principle), test cases with interdependencies (execution of one test shouldn’t be interfered by another), “all-knowing oracles”, slow running tests, and other “anti-patterns”.
Now you are ready to start using the TDD in your Tizen Xamarin projects.
How to get started?
First of all, we assume that you already have basic knowledge in Tizen Xamarin App development. For basic information, see https://developer.tizen.org/development/preview/getting-started.
For the instructions how to install Visual Studio Tools for Tizen, see https://developer.tizen.org/development/tizen-.net-preview/getting-started/installing-visual-studio-tools-tizen.
1. Integrating nunit.xamarin in your project
Your own nunit.xamarin Tizen GUI
To integrate nunit.xamarin test suite in your project you should add a new Tizen Xamarin App.
Right click on your solution and navigate to Add -> New Project… -> Tizen -> Blanc App (Tizen Xamarin.Forms Single).
Double click in the Solution Explorer on the program file of newly created app and edit the OnCreate() function as following.
	protected override void OnCreate()
        {
            base.OnCreate();

            // Tizen will not load all tests within the current project,
            // you must do it explicitly below
            var nunit = new NUnit.Runner.App();

            // If you want to add tests in another assembly, add a reference and
            // duplicate the following line with a type from the referenced assembly
            //nunit.AddTestAssembly(typeof(MainPage).GetTypeInfo().Assembly);
            nunit.AddTestAssembly(typeof(Program).GetTypeInfo().Assembly);

            // Available options for testing
            nunit.Options = new TestOptions
            {
                // If True, the tests will run automatically when the app starts
                // otherwise you must run them manually.
                AutoRun = true,

                // If True, the application will terminate automatically after running the tests.
                //TerminateAfterExecution = true,

                // Information about the tcp listener host and port.
                // For now, send result as XML to the listening server.
                // NOTE: Your UWP App must have Private Networks capability enabled
                //TcpWriterParameters = new TcpWriterInfo("192.168.0.108", 13000),

                // Creates a NUnit Xml result file on the host file system using PCLStorage library.
                CreateXmlResultFile = true,

                // Choose a different path for the xml result file
                // ResultFilePath = Application.Current.DirectoryInfo.Data + "Results.xml";
            };

            LoadApplication(nunit);
        }
Note that now you can remove the default App class, generated by Tizen Xamarin App template, because it is substituted by the NUnit App class and not needed any more.
For your developer convenience you can use system logs, for example:
NUnitLogs.LogMessage($"*********OnCreate***********");
The logs may be observed on the Tizen Sdb console by using the command:
sdb shell dlogutil NUNIT
Let’s see how to include all needed NUnit dependency packages. There are at least two ways to doing it.
You are the Boss of Continuous Integration
If you are establishing your Tizen App Development Process on the base of Continuous Integration, you will find useful adding nunit.xamarin and PCLStorage nupkg from the MyGet.
- Configure nupkg repository source
https://tizen.myget.org/F/nunit/api/v2and add the packagenuget.xamarin.tizenversion 3.6.1 or later. - Similarly for PCLStorage, configure a source
https://tizen.myget.org/F/pclstorage/api/v2and add the packagePCLStorageversion 1.0.1 or later.
Code ninja way
Get the full controll over your dependencies. Build nunit.xamarin SDK out of source codes and integrate it in your project with following three simple steps:
- Clone the SDK to your computer from the GitHub https://github.com/shulgaalexey/nunit.xamarin and switch to Tizen/Preview branch:
git clone https://github.com/shulgaalexey/nunit.xamarin.git
cd nunit.xamarin
git checkout Tizen/Preview
-
Open the nunit.runner.sln solution in Visual Studio and build nunit.runner.Tizen project in the Runner folder.
-
Add SDK library to your Tizen Xamarin App. Navigate to the Project -> Add Reference… -> Browse, press Browse button and select following dll:
./src/runner/nunit.runner.Tizen/bin/Release/nunit.runner.Tizen.dll
Build the PCLStorage for Tizen similarly.
- Clone the SDK to your computer from the GitHub https://github.com/shulgaalexey/PCLStorage.git and switch to Tizen/Preview branch:
git clone https://github.com/shulgaalexey/PCLStorage.git
cd PCLStorage
git checkout Tizen/Preview
-
Open the PCLStorage.sln solution in Visual Studio and build PCLStorage.Tizen project.
-
Add SDK library to your Tizen Xamarin App. Navigate to the Project -> Add Reference… -> Browse, press Browse button and select following two dlls:
./src/PCLStorage.Tizen/bin/Release/PCLStorage.Abstractions.dll
./src/PCLStorage.Tizen/bin/Release/PCLStorage.dll
Note. Many thanks to @PawelAndruszkiewicz who ported PCLStorage SDK to Tizen
Now all dependencies are set up and we can create test cases.
2. Preparing test cases
In the IDE navigate to the Project -> Add New Item… -> Test -> NUnit, specify test class name and press Add button.
Congratulations, your tests are ready for the first start!
Read more about validation API and test case annotations on the NUnit project site.
3. Checking test report: GUI and XML
Running tests require either Tizen Emulator or Target Device. Both TV and Mobile should work fine.
Set your TDD project as an executable in the solution by right clicking on it and selecting Set as Startup Project, attach the device to the USB or launch the Emulator (Tools -> Tizen -> Tizen Emulator Manager) and press F5.
In a moment you should see the app with a test report, including test case overall results, all test results and failed only test.
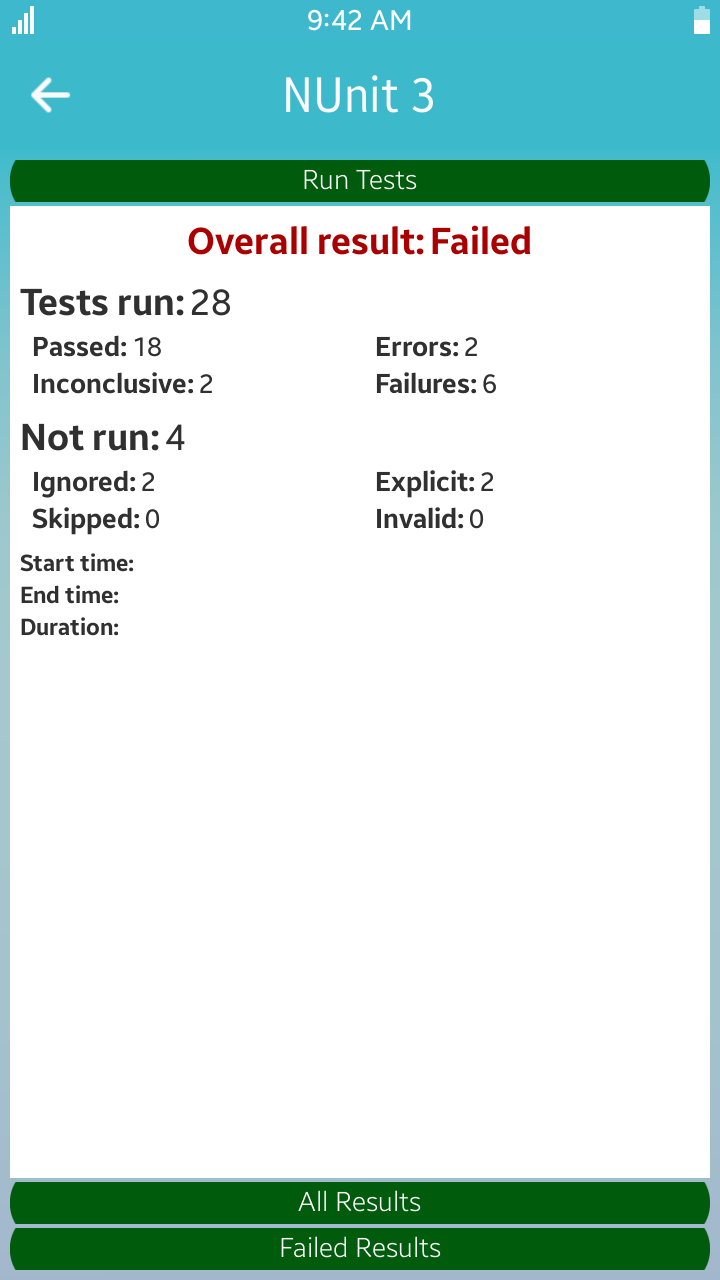
Overall results
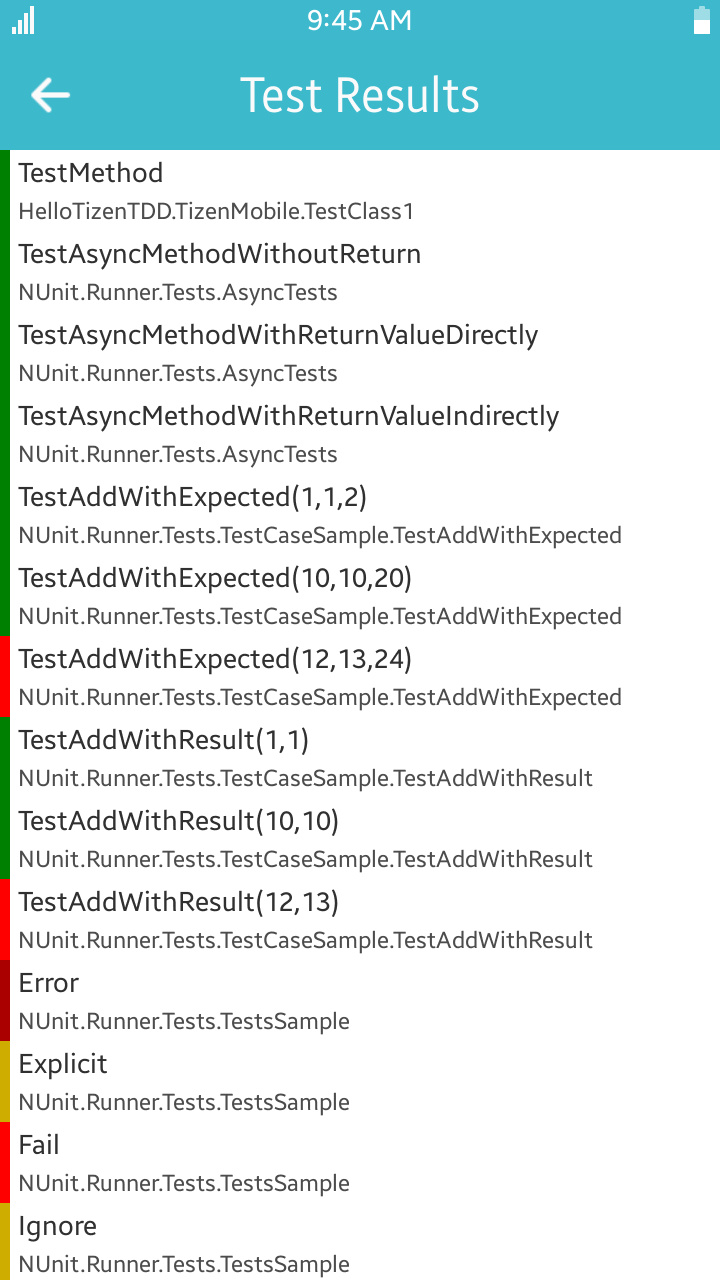
All tests
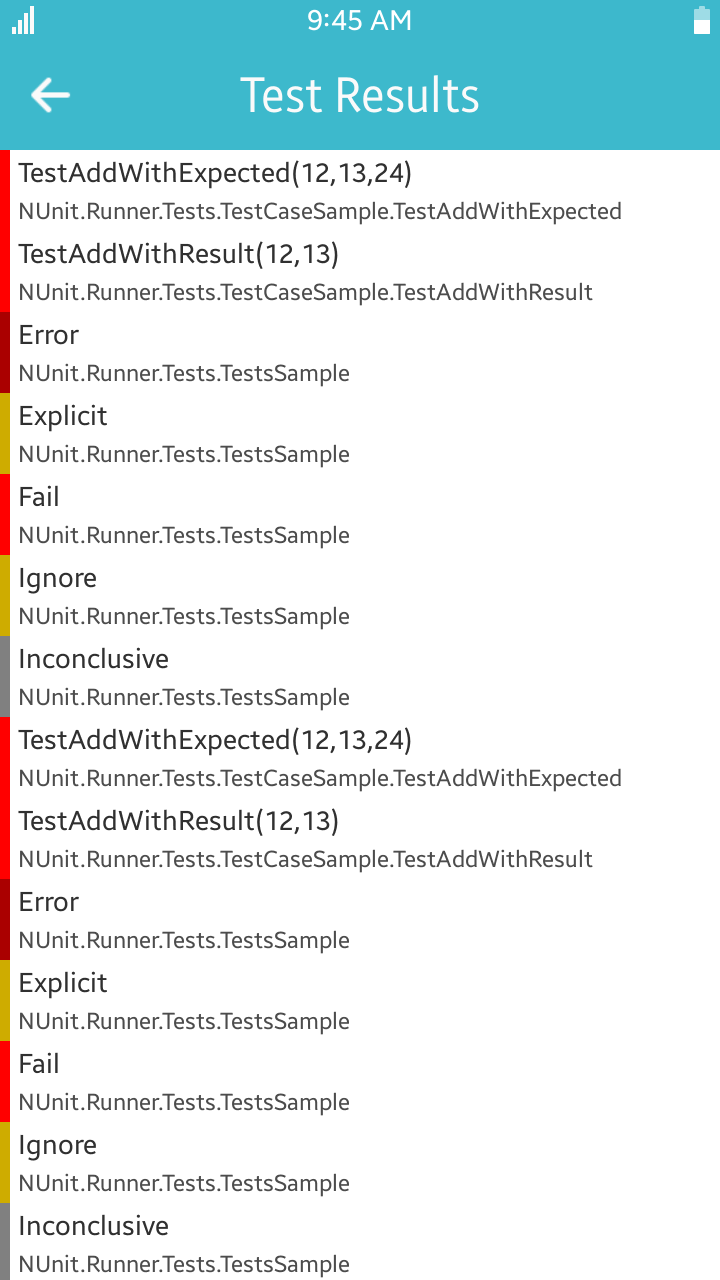
Failed tests
In order to check the XML report, navigate to your app folder on the device and access the Results.xml file in the ./Data sub-folder.
Another way of getting the report is to pull it directly to your computer. Open Tizen Sdb Console (Tools -> Tizen -> Tizen Sdb Command Prompt) and enter either of following instructions.
For Ubuntu:
>sdb pull /opt/usr/home/owner/apps_rw/{your_app_name}/data/TestResults.xml ~/{folder_on_your_pc}/
For Ubuntu on Windows:
>sdb pull /opt/usr/home/owner/apps_rw/{your_app_name}/data/TestResults.xml /mnt/c/{folder_on_your_pc}/
For Windows:
>sdb pull /opt/usr/home/owner/apps_rw/{your_app_name}/data/TestResults.xml c:\{folder_on_your_pc}\
Now you can open the XML file, saved on your computer, and review your unit testing report.
What we learned today?
You can and, for sure, should develop your Tizen Mobile and TV Apps in a TDD manner.
We propose to use nunit.xamarin SDK which offers testing capcities of popular NUnit Framework represented on a GUI and in XML reports.
Tizen .NET and Tizen Xamarin Mobile and TV SDKs are currently in the Preview mode and you can try it completely free of charge.
Give it a try and develop your own well tested world class Tizen apps.
What’s next?
The TDD allows you to develop and maintain perfect apps.
However on the next phase of your app life cycle, when it is shipped to you users, you may instrument it further with continuous monitoring tools. Read how you can integrate Mobile Analytics into your Tizen Xamarin App
To make your Tizen app development and delivery smooth, you may design your process based on Continuous Integration technique. Study how can you set up CI for Tizen here.
And finally, check out the Gallery of 3rd Party C# API available for Tizen to discover even more useful APIs and SDKs to apply in your exsiting projects.
Reference
- Tizen Developer page: https://developer.tizen.org/
- Sample application demonstrating nunit.xamarin and TDD: https://github.com/shulgaalexey/HelloTizenTDD
- The nunit.xamarin for Tizen on the GitHub: https://github.com/shulgaalexey/nunit.xamarin/tree/Tizen/Preview
- The PCLStorage for Tizen on the GitHub: https://github.com/shulgaalexey/PCLStorage/tree/Tizen/Preview
- The ninut.xamarin.tizen and PCLStorage nupkg on the MyGet:
- NUnit home page: http://nunit.org/
- TDD on Wikipedia